Editing
and Inserting Text for Graphics and Footnotes
In this section you will mark-up the pictures/graphics and
footnotes within the textbook. This will also include the
captions and descriptions for images. These items are "skippable"
- meaning that in the final product they can be skipped-over
in playback. We will not always be building pictures and
footnotes into the production process. Please refer to the
production sheet for instructions.
The
process you are learning has created .doc files that have
been saved as Webpage, Filtered. These
have been opened inside EasePublisher and have maintained
all of the graphical elements such as photos, charts, graphs,
pictures, formulas, tables, etc. For simplicity,
these will all be referred to simply as "graphics".
CREATING
DAISY WITHOUT GRAPHICS
If
you are instructed to create DAISY Talking Books without
inserting graphics, you will simply insert the associated
caption as if it were a separate paragraph and include text
letting the end-user know that a graphical element has been
removed as follows:
- Graphic 'X'
Removed: Please refer to page #X within the textbook.
- Be specific
with description [picture, chart, table, formula, etc.]
- The 'X'
refers to the name and identifying tags as printed in
the textbook.
- CAPTION: blar,
blar, blar
- This must
be exactly as printed in the textbook.
CREATING
CAPTIONS AS SKIPPABLE TEXT
Within EasePublisher,
the documents created and saved as "Webpage, filtered"
should have the graphical elements included within the cleaned-up
text. If the graphics are not included, they can be added
using a process that will be described later.
-
Within
the HTML Editor 
- Look for the
picture caption [if one does not exist it will have to be
created]
- Highlight all
of the caption and press (F4) to "create sentence of
selected text"
- Highlight the
graphic title or assigned graphic reference number and press
(F4) to "create sentence of selected text"
- With the graphic
title still highlighted, select (F9)
- Tools >
Mark current as > Footnote reference
- Select the
caption for the graphic from the display screen and click
"Create"
- Save the changes
within the HTML Editor
CREATING
ALT-TEXT for EXISTING GRAPHICS
For each graphic
you will be adding alternative-text for the caption that
will appear within the playback software and as alt-text
within the html version of the material. To do this is quite
simple:
-
Within
the HTML Editor 
- "right-click"
the graphic and select Create Alt-Text
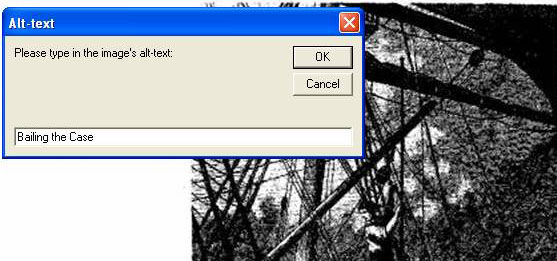
- Type the graphic
title or reference number into the box
- click "create"
or press the "enter" key.

INSERTING
GRAPHICS
In some instances,
graphical elements may not save or transfer properly when
editing and saving documents. In such instances, it will
be necessary for you to insert graphics into the .html file
within EasePublisher.
-
Make
certain the "webpage, filtered" version of the
materials has graphical elements.
-
Within
the HTML Editor 
- Place the cursor
in the position where you wish to insert the graphic
- Click "insert
image into HTML"
![Click "insert image into HTML" [the tree button]](graphics/section3_part23.jpg) [the tree button]
[the tree button]
- Select the picture
and click "OK" - an alt-text dialog box will appear
- Type in the
graphic title or reference number
- Highlight the
graphical element
- Press (F4) "Create
Sentence"
- Save the project
after each graphic insertion
- A caption can
then be created using the previously outlined process
INSERTING FOOTNOTES
Most of the time
we will be creating DAISY materials without footnotes. However,
students may request the insertion of footnotes as part of
the completed materials. This is especially true of Graduate
Students doing research. For our purposes, footnotes and end
notes are the same. Endnotes will be moved (shifted) from
the end of the textbook to each individual chapter.
-
Within
the HTML Editor 
- Select all of
the body text for a footnote and press (F4) "create
sentence of selected text"
- Select the reference
number (#) for the footnote and press (F4) "create
sentence of selected text"
- If desired,
the reference number can be made into superscript by using
the "superscript button" on the toolbar
 or pressing (ctrl + NumPlus)
- With the reference
number still highlighted, press (F9)
- Or select
Tools > Mark current as > Footnote reference
- Select the body
text for the footnote from the display screen and click
"Create" (ENTER)
- Save changes
in the HTML Editor after every footnote insertion
As
is Section 3 [part 2], should you notice any proofreading
goofs while in EasePublisher, you can fix them in the
same manner as editing Web content in Microsoft FrontPage
or another simplified Web production tool.
1.
First, click on the HTML symbol  on the icon toolbar.
2. Find the text you want to edit,
then fix accordingly. It’s as easy as typing.
3. Sometimes the program doesn’t
recognize everything you type. This happens rarely,
and is easy to fix.
+ Simply highlight the text you want to make a sentence,
and press F4.
+ The program will automatically detect the sentence,
and it should be highlighted in yellow like other sentences
in the program.
4. Click “X” to exit out
of HTML editor, and click "yes" on the save
prompt. |
Now
move on to Section Three (3):
Part 4- TTS Encode
|
|
