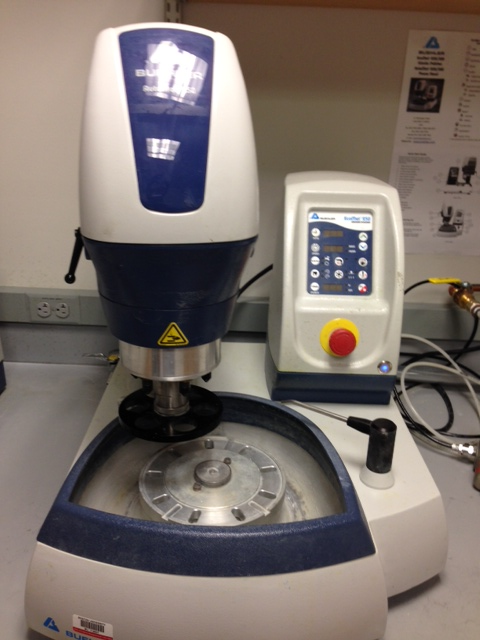
Polishing and Grinding SOP
Potential hazard in operation
- Splashing debris and water.
- Moving parts may hit fingers.
- Sharp objective.
- Electric shock.
- Compressed gas.
Check equipment and supplies
- Electricity supply should be ready. Turn the power switch ON (main switch is on the back).
- Water supply should be ready. Turn the water valve ON.
- When using auto polishing head, compressed air (35-40 psi) should be ready. Turn the compressed air switch ON
- Polishing head, rim and panel button must be clean. If not clean, clean with moist towel.
- Check polishing discs are clean and ready for use.
- Choose proper PPE for eye protection.
Preparations
- Make sure your polishing cloth or grinding paper are mounted properly. It should not be able to slip and all air bubbles must be removed.
- Make sure your specimen is suitable for polishing/grinding. The polishing surface must be flat and all edges (top and bottom) must be rounded (not sharp). Otherwise, there is a good chance that the cloth or paper will grab the specimen and pull it from your hand, or the edges may cut the cloth and possibly your hand.
- Make sure the rim is in place. Never operate the polisher/grinder without the rim in place.

Hand Polishing
- Start the motor and wait for it to come up to speed. Use less than 100 rpm for hand-hold polish.
- Gently lower the specimen to the center of the wheel. Once it is down apply pressure and slowly move it to approximately half way to the edge of the wheel.
- Slowly but firmly move the specimen in a clockwise direction.
- Use polishing media sparingly. Excess will just go down the drain or splatter all over the table.
Auto Polishing
- Mount the polishing disk on EcoMet as required.
- Mount sample holder and make sure the proper selection of pressure mode (single press and multiple press mode) on panel.
- Set timer.
- Using multiple press holder. Press and hold both green buttons till the holder touches the disc. Then release buttons.
- Mount 1.25" dia. specimens into the mount holes. Put the alignment chuck in.
- Press both green buttons once.
- Use polishing media sparingly. Excess will just go down the drain or splatter all over the table.
- Apply less than 15N on polishing cloth and less than 70 rpm. High load may delaminate the cloth and damage specimens. High speed may spin away the polishing paste.
- Never polish with the sand paper with metal ring frame. Use sand paper with back adhesive.
Polishing/Grinding Sequence
- Grind from 70 μm - 45 μm silicon carbide disc or 120-230 M sand paper to a reasonable flat surface or expose interested layer.
- Polish with 15 μm silicon carbide disc or 600M sand paper to remove large scratches.
- Polish with polishing medium 6 μm, 1 μm, 0.3 μm, and 0.05 μm diamond or alumina suspension.
- Specimens must be ultrasonically cleaned between two grits of polishing/grinding.
- Diamond suspension is very expensive, $750 per gallon. Use sparingly.
- Use alumina paste from PSI for soft materials. Nylon finishing cloth (PSI-621-8 or Buehler Microcloth) is best for alumina paste.
Finishing Up
When you are completely finished using the polisher/grinder you must do the following:
- Turn off the power, air and water of polisher/grinder.
- Clean up the disk (platten), making sure you remove the polishing cloth and polishing residue.
- Reusable cloth must be rinsed thoroughly, wipe dry, and leave in the designated place with clear mark.
- Clean the bowl, giving it a final rinse with water.
- Wipe the head holder, buttons, and rim with a moist towel or sponge. Dry them if necessary.
- Wipe up the area around the polisher/grinder. Dry it if necessary.
Polishing Supplies
- Silicon carbide sand paper 120, 180, 400, 600, 800, 1200, 2000 (Buehler Ltd, Lake Bluff, IL, USA)
- Diamond grinding disk, Apex Coarse Grinding Disc, Metal Back, 125 um (Buehler Ltd, Lake Bluff, IL, USA)
- Diamond grinding disk, Apex Disc, Metal Back, 45 um, 70 um (Buehler Ltd, Lake Bluff, IL, USA)
- Diamond grinding disk, Apex Disc, PSA 125 um (Buehler Ltd, Lake Bluff, IL, USA)
- Diamond grinding disk, UltraPrep Disc, PSA 70 um, 45 um, 15 um (Buehler Ltd, Lake Bluff, IL, USA)
- 6 um (yellow coded), 1 um (blue coded) diamond suspension (Buehler Ltd, Lake Bluff, IL, USA)
- l um, 0.3 um. 0.05um alumina suspension paste (Precision Surfaces International, Inc., Houston , TX)
Tips 
- Note: Surface should be shinning after 6um polish, and will be mirror-like after 1-0.3um polishing.
- Note: Do not use continuous water on diamond/alumina suspension.
- Note: Magnetic disk should be dried to hold magnetic polishing disk strongly.
- Note: ©2015-2021
Related Documents
ABRASIVE GRADE COMPARISON CHARTGuidance for polishing cloth Struer Polishing Methods, Metalogram