One of the expensive consumables in fluorescence imaging is the light source. Arc lamp bulbs, Mercury or Xenon, need to be replaced regularly and eventually the power supplies go as well. Well-funded labs will replace them or upgrade them with lasers. However, if expense is an issue or one needs to run a large number of setups, such as in the case of teaching labs, then a cheaper source is worth considering. After spending some time on the internet, I have located a suitable LED that is sufficiently bright and stable. The quality of light from this is as good as the Opticquip 150W Xenon lamp I used to use. Here is how I installed and implemented the LED light source.
LED:
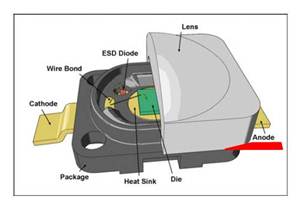
The Osram Diamond Dragon series provides the brightest single LED I found. You can order these from Digikey but you may have to check several times before they are in stock. The LED itself has a silicon cover, intended to scatter light (Fig.1). I carefully peel this off so that the LED element is clearly visible. It is important to use a pair of fine forceps to loosen the silicon from all sides first and then slowly peel it off. Normally this procedure leaves a clear and reasonably flat surface. The LED element is still protected by the remaining silicon after this procedure (Fig.2). You cannot remove the silicon completely; I tried this once and ended up damaging the LED.
|
Fig.1
|
Fig.2
|
|
Remove the silicon lens at its base, red wedge shape. Figure adapted from Osram brochure. |
The LED after the silicon lens has been removed. The LED element is clearly visible, meaning that the silicon over it is flat. |

The optical component:
I reuse the Optiquip lamp house and focusing lenses intended for the Xenon lamp. This is a cheap and green approach. One could buy parts from vendors such as Thorlabs or Newport, but that means time and money. (Note: some lamp houses, such as Zeiss, have a switch activated by ignition high voltage in the lamp house itself. You would have to short this to run your LED.)
Mechanical component:
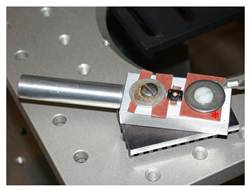
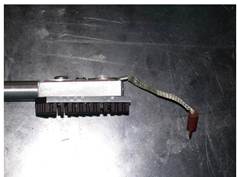
To use the existing lamp house, it is necessary to machine a simple adaptor in order to be able to mount the LED onto the sockets of the lamp house. The photo below shows the adaptor made by our machinist (Fig.3). The rod fits onto the same clamp socket as the 150W Xenon bulb. The square acts as the Anode and the dock for the LED. The rod and square are connected by a metal screw. A piece of insulator isolates the anode of the LED which in turn is connected to the cathoode of the lamp house (Fig.3 *). The square is somewhat bulky because it is meant to be a heat sink as well (see Gating of LED below for further comments). I use screws with pan heads to keep the profile low because I want to push the light-collecting lens as close to the LED as possible for maximal light collection (Fig.4).
|
Fig.3
|
Fig.4
|
|
The dock for the LED. See Fig.1 for close-up. |
Side view of mounted LED, to emphasize the low profile. |
Power source:
To generate stable light from the LED does not require an expensive light source. I have tested an LED with a DC power supply originally ordered from Jameco to run a Peltier cooler. The stability of light from this cheap power source, with visible ripples, is the same as that of the precision light source I am using now. I bought the latter, with a rating of 0.01% for ripple, years ago to stabilize a Tungsten lamp. I suspect that any DC brick with a sufficient power rating will do.
Gating of the LED:
I use a solid state relay for this job. Though this may be overkill, it is nice not having to worry about the vibration associated with mechanical shutters. In addition, gating the power to the LED has the advantage that the LED is on only when I am imaging. For a duty cycle of 10%, 500ms every 5 sec, I am able to run the LED overnight without issue. (I have noticed that when I use a new relay, it is necessary to put a bleeding resistor in the output. Otherwise the LED continues to be lit, with declining intensity, after the relay has been shut off).
This is a quick and dirty hack. I am sure that someone with an engineering background can find many faults in my design. Nevertheless, it works. I have had mine set up and running for about a year and everything seems to be fine, although I don't use it every day.